Categories and label are the same as
for Blogger Blog. Each post should have its similar or unique label related to
the post. This helps distinguish each post with similar labels from one
another. As you add more post, you tend to add more labels, as time goes,
the label might be too much and occupy the space in your sidebar. You might
latter resolve in limiting the number of labels shown but If you don't want to
limit the labels and wish to show all the labels, then there is need to create
a drop down label menu for the label widget.
Is
There Need To Create a Drop Down Label Menu?
It depends on how many labels you
have in your blog. If you are having more than twenty (20) labels, then you
really need to create a drop down Label Menu. One other reason is that the
default blogger label supports only the List and Cloud Label form. Those takes
space in the sidebar so there is need to shrink the labels by using the drop
down menu
How
To Use Drop Down Label Menu in Blogger
1. First Login your blogger dashboard
and Click on Layout
2. Add a New Label Widget or Leave
this step If you already have a blogger label widget
3. Now Go to your Template
4. Click on Edit HTML
5. Once you are in your HTML
section, click on Ctrl + F and input the text in blue below to find the Label
section
<b:widget
id='Label1' locked='false' title='Labels' type='Label'/>
Once you find the Line of the code,
replace the above code with the codes shown below
<b:widget id='Label1' locked='false' title='Categories' type='Label'>
<b:includable id='main'> <b:if cond='data:title'>
<h2><data:title/></h2> </b:if> <div
class='widget-content'> <select style='width:100%'
onchange='location=this.options[this.selectedIndex].value;'> <option>Click To Choose a Category</option>
<b:loop values='data:labels' var='label'> <option
expr:value='data:label.url'><data:label.name/> (<data:label.count/>)
</option> </b:loop> </select> <b:include
name='quickedit'/> </div> </b:includable> </b:widget>
Ensure you are careful with the how
you place the codes and If you notice any error when placing the code, you can
easily press Ctrl + Z to undo your action.
6. Finally Click Save Your Template
to implement changes.
If you notice any error, undo the
changes and make sure you paste the code only on the line of the Label Section.
How To Customize The Widget
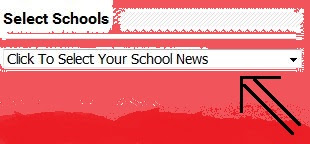
- If you wish to change the name of the label, change the
text in Blue to any name you wish. Like in the picture above, I used
Select schools as the Title.
- If you wish to change the Drop down Menu width, then
change the numbers percent in Red.
- If you wish to change the label text, change the text
in Yellow
- To remove the number of post in each label, delete only
the text in Green.
To implement any of those changes,
Kindly click Save Template and preview you blog to ensure it suits your taste.
If you are confused, Kindly notify
us using the comment widget.
Kindly share this post on Facebook,
whatsapp, Twitter, Google plus If you consider useful.

awesome post..
ReplyDeleteCheck it out our price comparison sites